How to create a Lesson using the Text with Video Component?
You can have a page with some text on one side and a YouTube video on the other side of the screen. You can add a thumbnail for the video too.
When to use this Component
You can use this component whenever you want to explain something with a video that is available on YouTube.
How it works
-
The pages created with this component are static, except for that you can click the video thumbnail to play the video.
-
When you click on the video thumbnail, the video starts playing.
-
Each page may contain only one title, one video and lot of description text.
-
The video will be stopped when you move to the next slide in the same Presentation. If you go back to the slide where the slide is, then the video will start playing from the beginning automatically.
Features of the this Component
-
The text can have bulleted points, hyperlinks etc.
-
You can upload your own thumbnail preview for your video.
-
You can place an optional heading for the page.
-
You can swap the sides of the video and text just by clicking a checkbox.
You can create a page using this component by following the below steps.
Step 1: Go to the required Slide
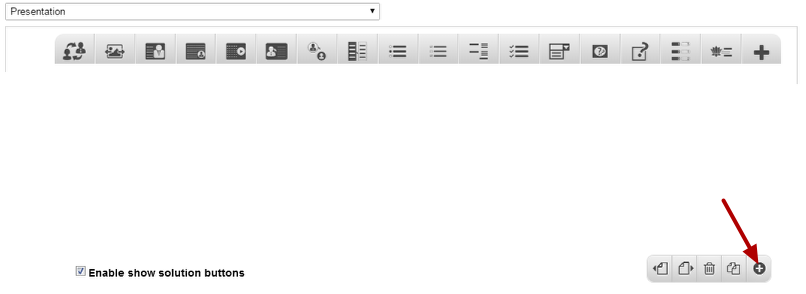
If you are creating a new Presentation, you will be taken to the first slide where you can use this component and create a page. Alternatively, if you want to add a new slide where you want to use this component, click on the '+' icon on the lower right corner as shown in the above image.
Step 2: Click on the Text with video Component Icon

Then click on the Text with Video component icon as shown in the above image. You will see a screen similar to the image shown below.
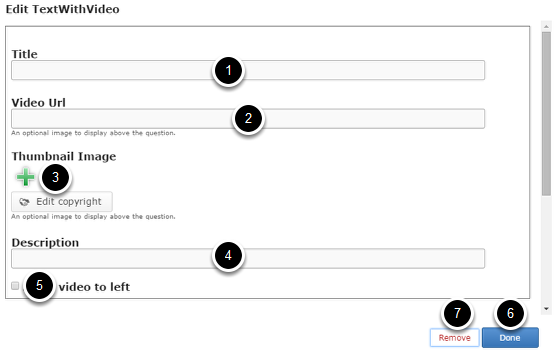
On this screen, you can
-
Add an optional title by typing it in the Title [1] field.
-
Add video Url by typing or pasting it in the Video Url [2] field.
-
Add an image related to the contents of the page by clicking on the '+' button below the Thumbnail Image [3] field.
-
Add the description text or contents of the lesson on the Description [4] field.
-
Swap the image to the left side by clicking on the Swap video to left [5] checkbox.
-
Save the changes you’ve just made by clicking the Done [6] button.
-
Remove the component from the slide by clicking the Remove [7] button.
Step 3: Add a Title (Optional)
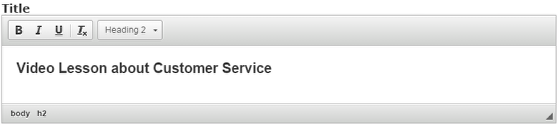
Type the title of the page on the Title field as shown in the above image. You can also change the format of the title. This field is not mandatory, and if you don't enter a title, it won't be shown as an empty space on the page.
Step 4: Add a video Url

Type or paste the embed URL of the video on the Video Url field as shown in the above image.
Step 5: Add a Thumbnail Image
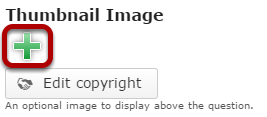
You can add a thumbnail image to the page by clicking the '+' icon as shown in the above image. You will see the below screen which will prompt you to choose an image file.
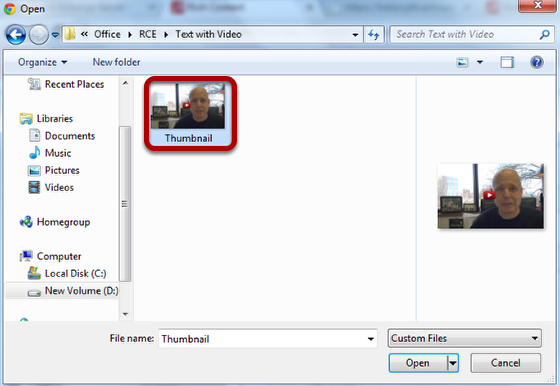
Select the folder from the above screen and select the image that you want to add to the page. You can see the image being uploaded under the Thumbnail Image title shown in the below image.
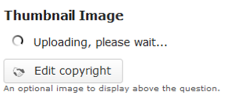
Once the image has been uploaded, you can see its preview under the Thumbnail Image title as shown [1] in the below image.

You can also update the copyright details of the image by clicking on the Edit copyright [2] button shown above. Once you click this button you will see the below screen.
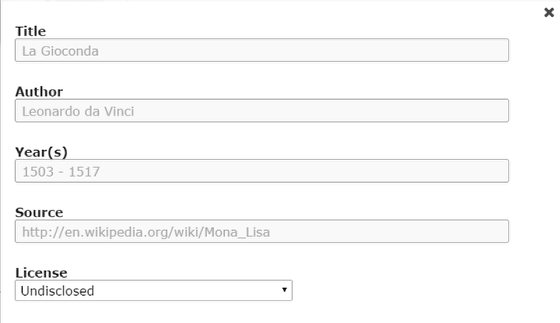
You can enter the image's copyright details on the above screen and click outside the window to update it.
Step 6: Add Description

Just type the contents of the page in the Description field as shown in the above image. You can also change the format of the text, add and remove hyperlinks and insert horizontal lines between the contents.
Step 7: Swap video to the left (Optional)
By default, the video appears on the right side of the screen. If you want it to appear on the left side, just check the Swap video to left checkbox shown above. In this example, the checkbox is left unchecked.
Step 8: Click the Done Button
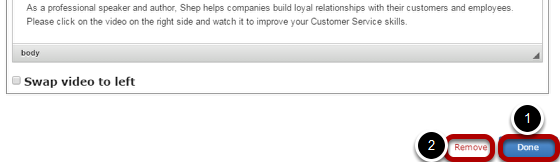
Once you've updated all the details, click the Done [1] button shown above to complete editing the page. You can cancel creating the page just by clicking the Remove [2] button shown above. If you click the Done button, you will see the below screen with a preview of the created page.
Step 9: Click the Create Button
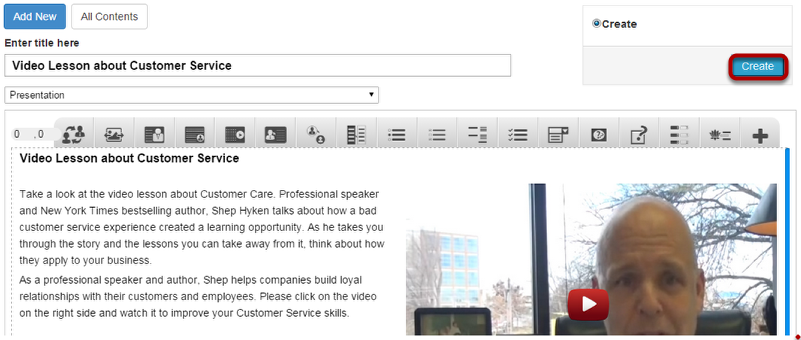
If you still want to edit the page, just double click on the preview page, and you will be taken to the Edit page. If you've done all the changes, you can click the Create button as shown above picture to finish editing the page.

You can see the finished page as shown in the above image. You can add as many pages as possible using this component in a Presentation.
How to get the Embed URL of a YouTube Video
Step 1: Go to the YouTube page
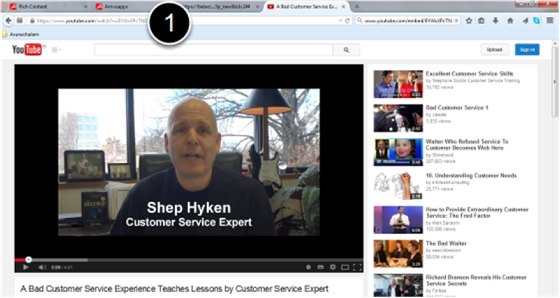
On your browser, go to the YouTube page where the required video is. In this case, we are in a page with the below link:
https://www.youtube.com/watch?v=8YWxXPcTNDM [1]
Step 2: Right click on the Video
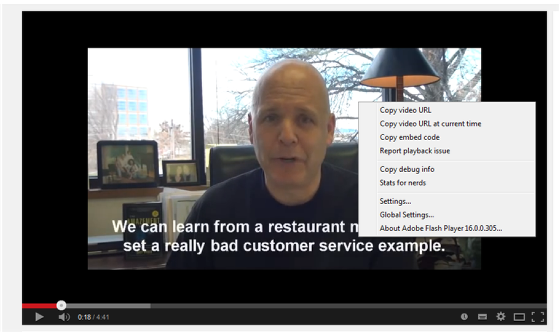
Right click on the video, so that a context menu will appear.
Step 3: Select Copy Embed Code Option from the Menu
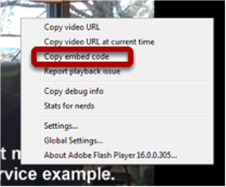
Select Copy embed code option from the menu as shown in the above picture.
Step 4: Paste the Embed Code

Paste the copied embed code in the Video Url field of the component as shown in the above image. In our case the pasted embed code is:
<iframe width="640" height="360" src="https://www.youtube.com/embed/8YWxXPcTNDM?feature=player_detailpage" frameborder="0" allowfullscreen></iframe>
Step 5: Edit the Embed Code

Edit the pasted embed code that only the required part of the embed code is on the Video Url field as shown in the above image. You can remove all details about the frame and the required embed code should start with two forward slashes (//). So, the resultant embed code we need here is
//www.youtube.com/embed/8YWxXPcTNDM
Notes
-
You can upload thumbnail images in .jpeg, .png and .gif formats only.
-
Even if you swap the video to the left side, the title will remain on the left side only. You won't be able to swap the side of the title.
-
You can create as many pages as possible in a Presentation using this component.
-
Please make sure that the video is available to be used in your page, because some videos can’t be embedded due to privacy and copyright reasons.